

Okay! So everyone wanted me to do this write-up, so I guess I have some kind of an obligation to fulfill! Here's my first, write-up, EVER!!! So bare with me. This write-up is for a 92 GT-S w/out the super fancy heat controls. You can probably use it for the other years but I'm just stating that this is specifically for a 92 GT-S.
As always:
THIS IS ONLY A GUIDE TO HELP YOU TO CHANGE YOUR GAUGE LIGHTS TO LED. I AM IN NO WAY RESPONSIBLE FOR ANY OF YOUR F**K-UPS, OR IF YOU BREAK ANYTHING.
Thank you.
Alright! So here's what your gonna want to start with:
![Image]()
There's a plastic cap hiding two screws under your ignition keyhole. Pop the cap off with a big flat head screw driver. Unscrew those two screws.
Then on the other side,
![Image]()
unscrew those two screws. After the 4 screws are gone, you should be able to pop out the top of this steering wheel shroud thing. It's kinda tricky but you can sorta flex it a bit and jiggle it out without too much trouble. It's easier if you lower your steering wheel too.
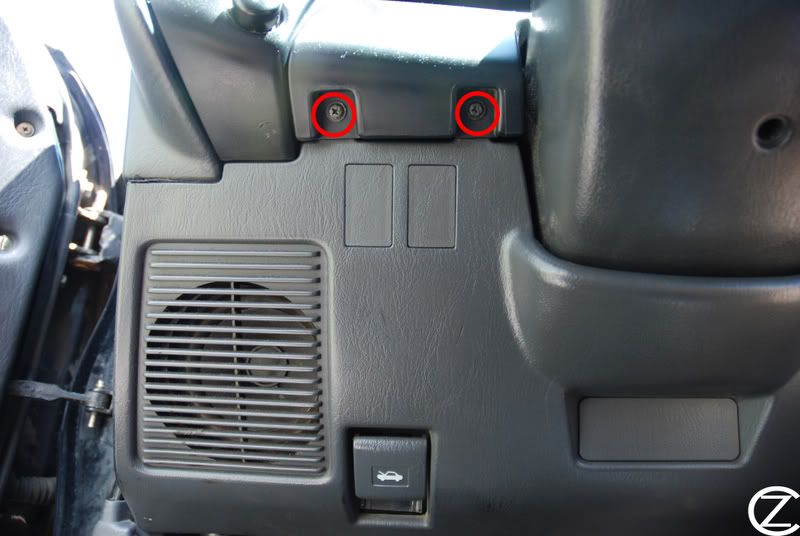
Then your gonna want to unscrew these two screws:
![Image]()
And the one in the far right of this picture:
![Image]()
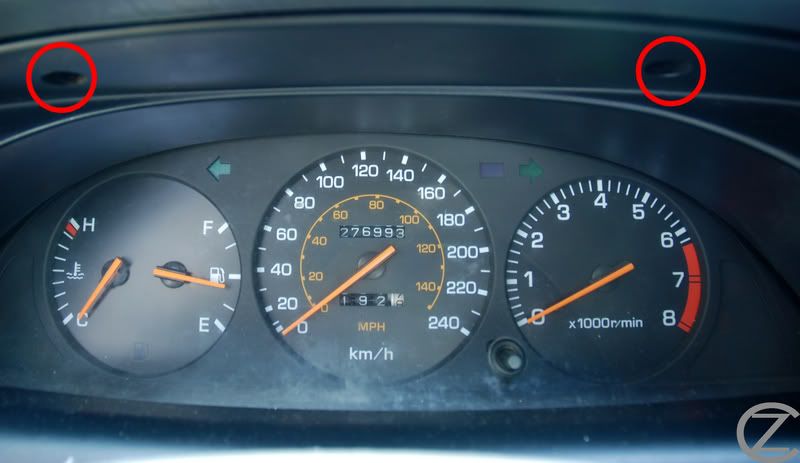
And after that's done you'll be able to pop out the left side of HVAC control shroud. After you pop out the left side, the right side only pops out but can't be pulled... so don't try. So you'll have something that looks like this:
![Image]()
You can see the gauge cluster pretty good at this point. You'll see that there's 4 screws around it holding onto the white part. You'll want to take these out, but only these!! The other ones just hold the plastic shield protecting your needles. You can take it a part later if you want to clean it or something.
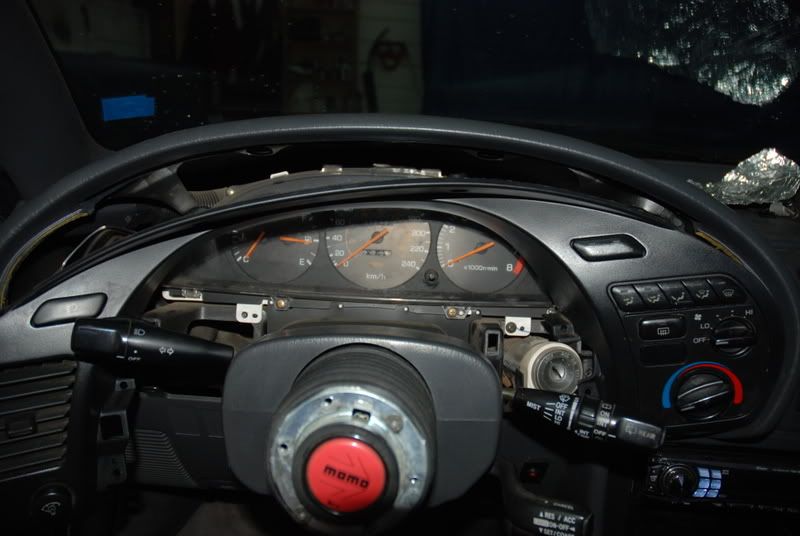
Anyway, once you take out those 4 screws, you can pull on the gauge cluster a bit to pop it out of the speed hole thing, so your left with three clips holding the gauge in. You'll have to kinda force/flex the heat control plastic thing so that you can get to the clips. Once your done with those you can jiggle the cluster out.
YAY!! Harder part is done so you can take a break and have a beer. Or a pop if your under-age.
Now, your going to want to already have ordered your LED's at this point, otherwise you'll be left with a car that you can't really drive until the lights come in. The package I ordered looked like this:
![Image]()
I had been misinformed about the bulbs I needed. I ordered ones for an All-Trac I'm assuming since some of 'em didn't fit. Go to superbrightleds.com to get the best LED's I could find on the net. They have a built-in "(use smart electrical term here)" built-in so you can dim them. Most LED's can't dim so this is fun to have if you find they're too bright.
Now this is the picture that's gonna save you a world of hurt:
![Image]()
The sockets are highlited like so:
Blue = Back lighting / Main gauge color
Red = Information lights
Green = Turn signals
Cyan = High Beam
Amber = Low fuel light
For your back lighting your going to need 5 "WLED-x5 LED Wedge Base Bulbs" and one "#74 Wedge Base LED bulb" in whatever color your going to choose. And for the Low-Fuel light you'll need a "#194 WLED 1-LED bulb".
Now the bulbs I was told to use were all #194's... But once I tried to put them in the wouldn't fit in the holder or the hole. So I was like oh great... 20$ in LED's out the window. Turns out superbrightleds.com is actually going to refund me for them. I sent 'em back before the 30 day period was over so I should be getting a refund soon. Anyway back to the bulbs.
Now for all the other lights in the cluster (ie. the info lights, the high beam and the signal lights) you'll just need to use some more #74 bulbs. Either get them the color you'll need 'em or get them white. They're all tinted in the color you need it to be so the LED's shine trough real good. I didn't notice a difference between bulbs and LED's but if you feel the need to LED-afi it, go ahead.
This is what the holders look like:
![Image]()
With a #74 bulb, you can't put it all the way in, otherwise it bends the plastic so you can't put the holder back into the hole. I guess you could do some cutting or gluing or something to over come this but I just put it in deep enough so it would hold but not too deep as to stop it from going in. It'll take you a few tries to gauge how deep you can put it but you'll eventually get the hang of it. For the back lighting bulbs, it was a perfect fit. So don't worry about those.
Now up until this point I haven't figured out how to take apart the HVAC controls so that I can get to the bulbs in the back, but I'm told they're all #74 bulbs too. It'll take you about 7 or 8 to do it but I'd get 12 just in case. You don't want to break one and be left with a few missing after that.
I also did the light in the ash tray, glove box, ignition halo and cigarette lighter with #74 bulbs, and I used a "9mm bayonet base 4 LED" for the map light. The catch is that it shines straight to the side, so I used some aluminum foil to redirect the light downwards and it works like a friggin charm! For the dome light, the doors and the trunk, I couldn't find out which bulbs I needed, like in mm lengths, so I didn't order those yet.
I like having a detailed list ready for when the time comes to order all the bulb, so for the gauge cluster you'll need:
5x WLED-x5 LED Wedge Base Bulbs in whatever color you want the back lighting to be
1x #74 Wedge Base LED Bulbs in whatever color you want the back lighting to be
11x #74 Wedge Base LED Bulbs in white
And for the interior lights, choose 'em in whatever color you want, but I suggest white for the best light output:
1x 9mm Bayonet Base 4 LED Bulb for the map light
4x #74 Wedge Base LED Bulbs for the key halo/cigarette lighter/ashtray/glove box
Now for the dome light/trunk light/door lights, they all use festoon bulbs but I'm just not sure which length we need. So either measure it and take a few mm's extra, I'm assuming, 'cause I couldn't find one the exact same size, and order them a tiny bit longer. The festoon bulb holders stretch so that probably won't be much of a problem.
To put it back together, you'll need to plug the cables back in, and align the green thing on the back of the gauge cluster with the hole in the dash. It takes a few tries but once it's back you can snap everything back in, and replace all the screws. Take your time and make sure you don't forget anything. Oh and make sure to test light all your bulbs along the way, you don't want to have to take everything apart once your done.
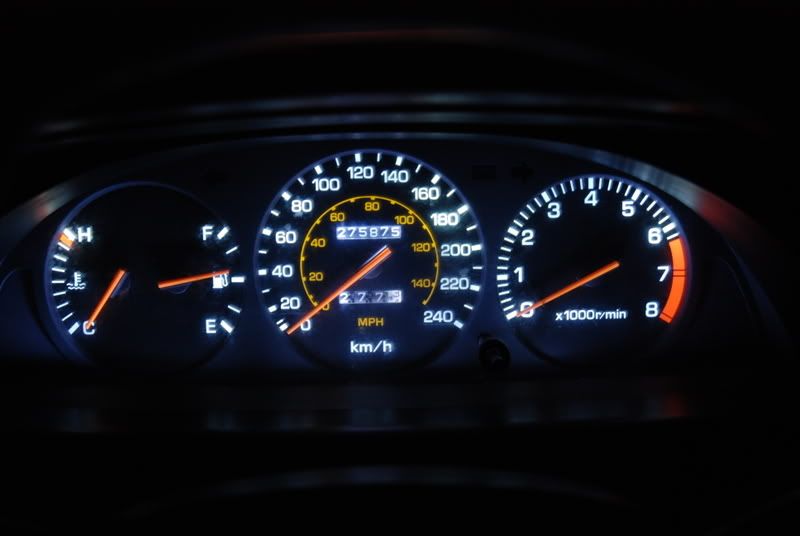
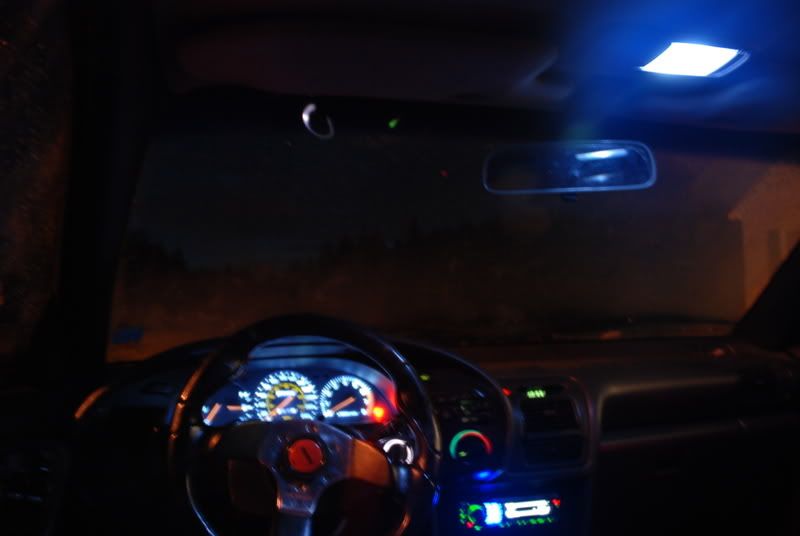
Oh and this is how it all turned out.
![Image]()
![Image]()
![Image]()
Okay, wow... that ended up pretty long. I hope this write up answers any of your questions and if not well I'll be around.
As always:
THIS IS ONLY A GUIDE TO HELP YOU TO CHANGE YOUR GAUGE LIGHTS TO LED. I AM IN NO WAY RESPONSIBLE FOR ANY OF YOUR F**K-UPS, OR IF YOU BREAK ANYTHING.
Thank you.
Alright! So here's what your gonna want to start with:
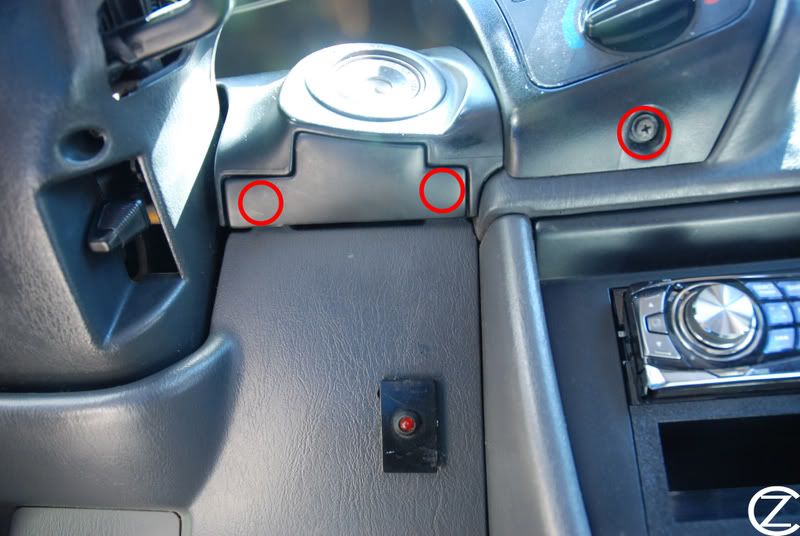
There's a plastic cap hiding two screws under your ignition keyhole. Pop the cap off with a big flat head screw driver. Unscrew those two screws.
Then on the other side,
unscrew those two screws. After the 4 screws are gone, you should be able to pop out the top of this steering wheel shroud thing. It's kinda tricky but you can sorta flex it a bit and jiggle it out without too much trouble. It's easier if you lower your steering wheel too.
Then your gonna want to unscrew these two screws:
And the one in the far right of this picture:
And after that's done you'll be able to pop out the left side of HVAC control shroud. After you pop out the left side, the right side only pops out but can't be pulled... so don't try. So you'll have something that looks like this:
You can see the gauge cluster pretty good at this point. You'll see that there's 4 screws around it holding onto the white part. You'll want to take these out, but only these!! The other ones just hold the plastic shield protecting your needles. You can take it a part later if you want to clean it or something.
Anyway, once you take out those 4 screws, you can pull on the gauge cluster a bit to pop it out of the speed hole thing, so your left with three clips holding the gauge in. You'll have to kinda force/flex the heat control plastic thing so that you can get to the clips. Once your done with those you can jiggle the cluster out.
YAY!! Harder part is done so you can take a break and have a beer. Or a pop if your under-age.
Now, your going to want to already have ordered your LED's at this point, otherwise you'll be left with a car that you can't really drive until the lights come in. The package I ordered looked like this:
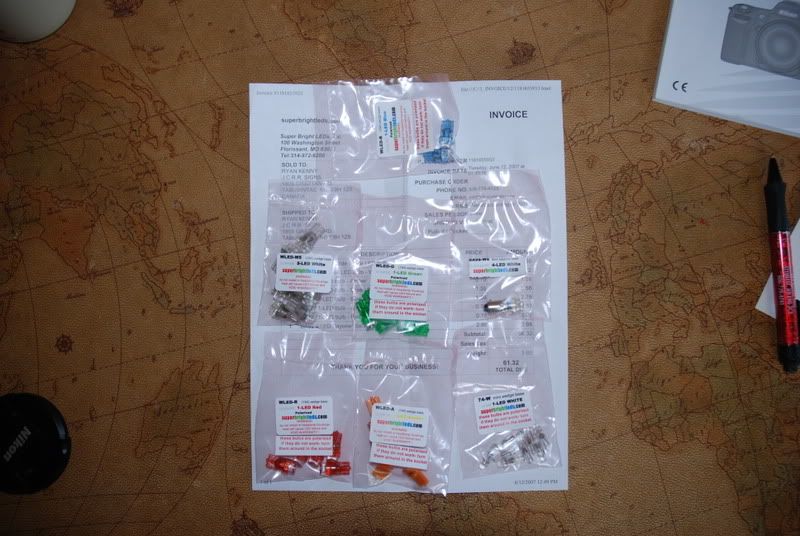
I had been misinformed about the bulbs I needed. I ordered ones for an All-Trac I'm assuming since some of 'em didn't fit. Go to superbrightleds.com to get the best LED's I could find on the net. They have a built-in "(use smart electrical term here)" built-in so you can dim them. Most LED's can't dim so this is fun to have if you find they're too bright.
Now this is the picture that's gonna save you a world of hurt:
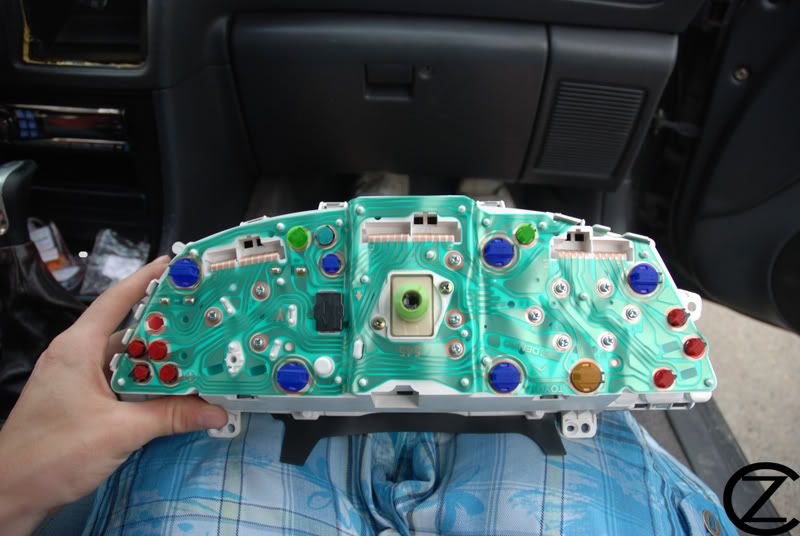
The sockets are highlited like so:
Blue = Back lighting / Main gauge color
Red = Information lights
Green = Turn signals
Cyan = High Beam
Amber = Low fuel light
For your back lighting your going to need 5 "WLED-x5 LED Wedge Base Bulbs" and one "#74 Wedge Base LED bulb" in whatever color your going to choose. And for the Low-Fuel light you'll need a "#194 WLED 1-LED bulb".
Now the bulbs I was told to use were all #194's... But once I tried to put them in the wouldn't fit in the holder or the hole. So I was like oh great... 20$ in LED's out the window. Turns out superbrightleds.com is actually going to refund me for them. I sent 'em back before the 30 day period was over so I should be getting a refund soon. Anyway back to the bulbs.
Now for all the other lights in the cluster (ie. the info lights, the high beam and the signal lights) you'll just need to use some more #74 bulbs. Either get them the color you'll need 'em or get them white. They're all tinted in the color you need it to be so the LED's shine trough real good. I didn't notice a difference between bulbs and LED's but if you feel the need to LED-afi it, go ahead.
This is what the holders look like:
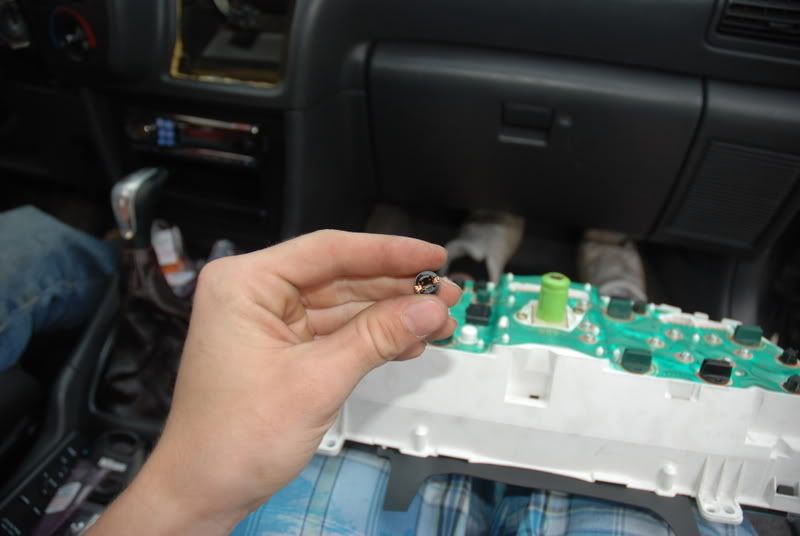
With a #74 bulb, you can't put it all the way in, otherwise it bends the plastic so you can't put the holder back into the hole. I guess you could do some cutting or gluing or something to over come this but I just put it in deep enough so it would hold but not too deep as to stop it from going in. It'll take you a few tries to gauge how deep you can put it but you'll eventually get the hang of it. For the back lighting bulbs, it was a perfect fit. So don't worry about those.
Now up until this point I haven't figured out how to take apart the HVAC controls so that I can get to the bulbs in the back, but I'm told they're all #74 bulbs too. It'll take you about 7 or 8 to do it but I'd get 12 just in case. You don't want to break one and be left with a few missing after that.
I also did the light in the ash tray, glove box, ignition halo and cigarette lighter with #74 bulbs, and I used a "9mm bayonet base 4 LED" for the map light. The catch is that it shines straight to the side, so I used some aluminum foil to redirect the light downwards and it works like a friggin charm! For the dome light, the doors and the trunk, I couldn't find out which bulbs I needed, like in mm lengths, so I didn't order those yet.
I like having a detailed list ready for when the time comes to order all the bulb, so for the gauge cluster you'll need:
5x WLED-x5 LED Wedge Base Bulbs in whatever color you want the back lighting to be
1x #74 Wedge Base LED Bulbs in whatever color you want the back lighting to be
11x #74 Wedge Base LED Bulbs in white
And for the interior lights, choose 'em in whatever color you want, but I suggest white for the best light output:
1x 9mm Bayonet Base 4 LED Bulb for the map light
4x #74 Wedge Base LED Bulbs for the key halo/cigarette lighter/ashtray/glove box
Now for the dome light/trunk light/door lights, they all use festoon bulbs but I'm just not sure which length we need. So either measure it and take a few mm's extra, I'm assuming, 'cause I couldn't find one the exact same size, and order them a tiny bit longer. The festoon bulb holders stretch so that probably won't be much of a problem.
To put it back together, you'll need to plug the cables back in, and align the green thing on the back of the gauge cluster with the hole in the dash. It takes a few tries but once it's back you can snap everything back in, and replace all the screws. Take your time and make sure you don't forget anything. Oh and make sure to test light all your bulbs along the way, you don't want to have to take everything apart once your done.
Oh and this is how it all turned out.

Okay, wow... that ended up pretty long. I hope this write up answers any of your questions and if not well I'll be around.


